
HTTP is the most widely used protocol today, and is supported by almost every device that connects to a network. As web pages continue to grow in size and complexity, web browsers and the HTTP protocol itself have evolved to ensure that end users can meaningfully engage with this rich content. This article describes how HTTP has evolved from a simple request-response paradigm to include mechanisms for high performance applications.
The original HTTP protocol (commonly referred to as version 0.9) was designed around rudimentary request and response communications running on top of TCP/IP, and was intended to support the transfer of simple HTML documents.
Each request consists of a one-line ASCII character string (GET followed by the path of the resource being requested) terminated by CR/LF, and the response is also an ASCII character stream. There are no headers containing meta-information about requests and responses. A new TCP connection is opened with each request, and closed after the response is received.
This protocol soon evolved to support additional features, including: serving non-HTML documents (such as images), enabling clients and servers to negotiate the type of content to be exchanged, its size, its encoding, etc. These features are formally captured in the HTTP/1.0 Informational RFC 1945[1], which describes the common usage of the HTTP protocol between clients and servers. It clarifies that HTTP is defined as “an application-level protocol with the lightness and speed necessary for distributed, collaborative, hypermedia information systems”. The first formal standard for HTTP/1.1 was defined in RFC 2068[2], which was later superseded by RFC 2616[3]. This is the standard most commonly used today, even though the protocol has evolved to the new HTTP/2standard defined in RFC 7540[4].
The growing complexity of web pages is a key driving force behind the evolution of the HTTP standard. Loading a typical web page today accesses more than 100 subsidiary URLs (including 20+ JavaScript files, 7+ CSS files and 50+ images) totaling nearly 3MB of data [9]. Thus, it is interesting to ask the following questions: How does the server manage this significant per-client load without exhausting its resources? Since some of this data is repetitive, how does the client avoid redundant downloads (thereby reducing load times and network usage, as well as reducing server load)? How can websites deliver acceptable user experiences when network connectivity is poor?
To address these questions, this article will show how the HTTP protocol has evolved to include multiple mechanisms to improve the application performance delivery. For web application developers, factors such as network performance and hardware configuration are not controllable. Hence, developers must consider the following aspects while optimizing web network performance:
i. Making use of HTTP persistent connections (using the Keep-Alive header). This avoids one round trip delay, thereby improving performance.
ii. Making efficient use of caching as supported by the HTTP protocol.
iii. Making use of chunk-transfer-encoding to display content as it is received, rather than waiting to receive the entire content before displaying it.
We will focus on these three techniques, although there are several other ways to improve performance including compression, minimizing the number of HTTP redirects (more than 80% of websites use redirects[9]), reducing the number of DNS resolutions, and making use of Content Delivery Networks (CDNs) to locate large-sized content (typically, multimedia) closer to users, thereby reducing end-to-end delay.
Following the experiential approach taken in first article of this series (June 2017 issue of ACC.digital[11]), we describe the setup for experiments that will illustrate these concepts. The basic setup is shown in Figure 1, consisting of a web server machine (running Apache web server [7]) named myweb.com, and a client machine running the Firefoxweb browser1 . The two machines (which can be basic desktops or laptops) are connected via a simple network (e.g., via a Wi-Fi access point, or directly with an Ethernet cable). For concreteness, we will assume that the web server’s IP address is 10.1.1.1 and the client’s IP address is 10.1.1.101. (Please note that in your experimental setup, these IP addresses are likely to be different.)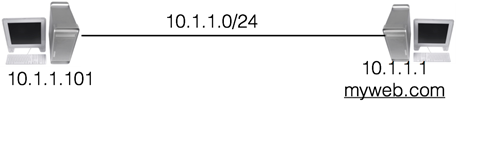
Figure 1: A simple connection between the client (left) running the Firefox browser and the web server (right)
For our experiments, we need to observe details of the TCP connections established and terminated between these two machines. To do so, we will make use of the most widely used network diagnostic tool:Wireshark [5]. This utility allows us to capture and analyze each byte of every packet that traverses the network. For a detailed understanding of Wireshark, we refer readers to the user guide [5].
The default approach in both HTTP/0.9 and HTTP/1.0 protocols is to establish a separate TCP connection for each URL access. Such connections are called non-persistent. Although non-persistent connections are simple, they have three main disadvantages:
i. A new TCP connection must be established for each URL access. This results in an additional round trip delay for setting up a TCP connection.
ii. For each new TCP connection, the web server must allocate resources (buffers, TCP state variables, etc.) which results in significant overhead for the web server.
iii. Most web page today consists of multiple objects, so the web server needs to concurrently serve several TCP connections for a single client web browser.
In HTTP/1.1, the default2 is to use persistent connections. These overcome the disadvantages listed above because a single TCP connection is reused to serve multiple HTTP requests (concurrently, if needed). This change has led to such a significant performance improvement that it has been back ported to HTTP/1.0. The HTTP protocol defines two headers (Connection and Keep-Alive) that identify whether a web request is using persistent or non-persistent connections.
The header line Connection: Close means that the TCP connection should be closed immediately after the web request is served, implying non-persistence. In contrast, the header line Connection: Keep-Alive means that the underlying TCP connection should remain open for serving web requests in the future, implying persistence. To establish a persistent connection, both the client and the web server should support such connections. If either one does not support persistence, then the connection is non-persistent.
A persistent TCP connection should not remain open forever. For instance, when the client navigates to a different web site, keeping the underlying TCP connection open will lead to unnecessary resource consumption on the original web server, causing its performance to degrade. Further, the web server will quickly reach the limit on the maximum number of open TCP connections it can support, after which it will no longer be able to cater to new requests. Thus, there is a need to define a timeout after which a persistent TCP connection needs to be closed. Further, it is prudent to impose a limit on the total number of web requests that can be served on a given persistent TCP connection. To understand why, suppose a web server has a bug that leads to resource inconsistency (e.g., a memory leak) while serving a web request. The greater the number of web requests served on a TCP connection, the greater the resource leak. Hence, permitting several web requests on one TCP connection could exhaust web server resources. The header Keep-Alive has two parameters (timeout and max) to handle these two concerns.
For example, the header line Keep-Alive: timeout=100, max=250 states that the underlying TCP connection can be kept idle for up to 100 seconds. If no new HTTP requests are received for 100 seconds after serving the last request, the underlying TCP connection will be closed. Further, the parameter max=250 states that after the first request, a maximum of 250 additional HTTP requests can be served on the underlying TCP connection. If another (251st) request is sent, the web server sends the HTTP header Connection: Close to indicate that the TCP connection is now closed. To service the next (252nd) request from the same web client, a new TCP connection must be established before web content can be exchanged. Further details about persistent and non-persistent connections can be found in the textbook by Kurose and Ross [6].
Although RFC 2616 [3] suggests that only two concurrent persistent connections should be established between a client and a web server, modern browsers allow a greater number of concurrent connections. The default values for Firefox and Google Chrome browsers is 6, whereas IE10 sets the default value at 8 and Edge (Windows 10) sets the default number of concurrent connections to a website even higher. Among these browsers, only Firefox allows users to easily change the number of concurrent persistent connections. Enter about:config in the URL bar(this triggers a warning), find the field max-persistent-connections-per-server, and double-click on it to change the value as shown in Figure 2.
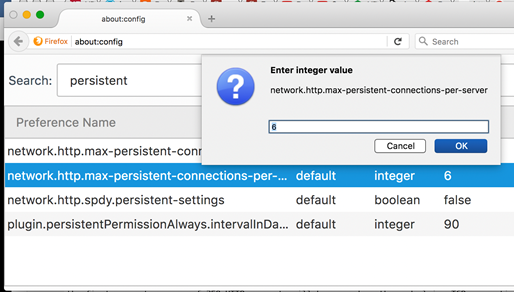
Figure 2: Configuring the maximum number of concurrent persistent connections per server
To gain hands-on experience with persistent connections, we will configure the Apache web server to understand how web servers support such connections. The Apache web server’s configuration directives (which specify how the web server will process web requests) are typically defined in the file/etc/apache2/apache2.conf on an Ubuntu Linux installation. These directives have the format “Name-of-directive Value”. The directive Keep Alive On, which is the default configuration at the time of installation3, tells the web server to allow persistent connections. To configure Apache to use non-persistent connections, edit the configuration file by changing this directive to Keep Alive Off. The two directives discussed below are applicable only for persistent connections (i.e., when the directive Keep Alive On is set). The directive Keep Alive Timeout N specifies the maximum number of seconds N that the web server can wait on a persistent connection for subsequent web requests to arrive before closing the TCP connection.
The default value of N is 5. Similarly, the directive Max Keep Alive Requests M specifies that the web server can serve a maximum of M HTTP requests on a single TCP connection. On the first request served by the server, its response header will contain the value Keep-Alive: max=M, timeout=N. In subsequent requests, the value of the max field will keep decreasing by one. In the last request, the web server will set the response header to Connection: Close.
For our first set of experiments, create a web page named pictures.html with several embedded URLs such, as images. The source code for this page is shown in Listing 1. Deploy this page on the webserver myweb.com (i.e. 10.1.1.1) in its document root (typically in the directory /var/www/html). Choose ten image files img-01.jpg, img-02.jpg,…, img-10.jpg which are embedded in the web page pictures.html and place these within the document root in a folder called img.
Listing 1: A simple HTML web page with embedded images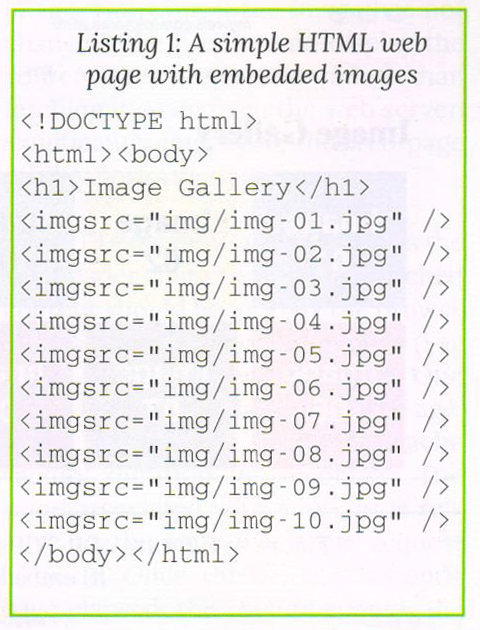
To study non-persistent connections, first ensure that the Apache web server configuration file has the directive Keep Alive Off. Next, start the Wireshark program 4 either on the client machine or on the web server and select the appropriate network interface (e.g.,eth0 or enp0s5). Since we are interested in observing the number of TCP connections that are established when the web page is served, define the capture filter to capture only TCP SYN packets from the client browser to the web server (e.g., tcp[tcp-flags] & tcp-syn != 0 and dst myweb.com and port 80)5 .This capture filter will only show those SYN packets that are sent by browser client to the web server. Access the web page http:/myweb.com/pictures.html in the client browser (as shown in Figure 3), and stop the Wireshark capture after the page is fully rendered. Since the web page contains 10 embedded images, a total of 11 URLs are accessed whenever the page is rendered. Since the connection is non-persistent, we observe 11 SYN packets as shown in Figure 4.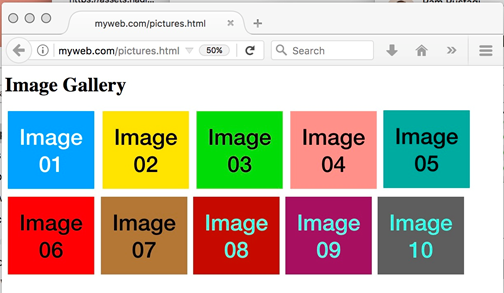
Figure 3: Web page with 10 embedded images
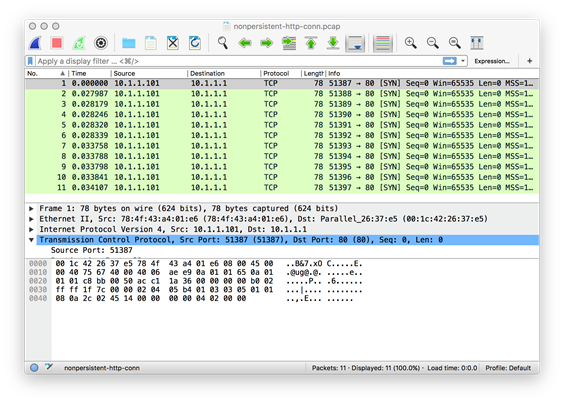
Figure 4: Capture of 11 TCP SYN packets for the page with 10 embedded images
Now restore the following directives in the Apache the web server configuration file to their default values: Keep Alive On, Max Keep Alive Requests 100, and Keep Alive Timeout 5. Restart the web server6 and start a new Wireshark capture with the same capture filter as before. In the Firefox browser, set the number of concurrent persistent connections to 3 (as shown in Figure 2) and reload the web page http://myweb.com/pictures.html. This time, observe that the Wireshark capture only shows 3 SYN packets being sent from client browser to the web server(as shown in Figure 5) to service the 11 accessed URLs7.
To study the impact of the directive Timeout 5, refresh (or reload) the page multiple times within about 4 seconds after the previous rendering of the web page. Observe that no new SYN packets are captured by Wireshark, because refreshing the page is keeping the original TCP connection alive before the timeout expires. To see the impact of this timeout, refresh the web page after 6 seconds and note that Wireshark will indicate that all three TCP connections have been re-established.
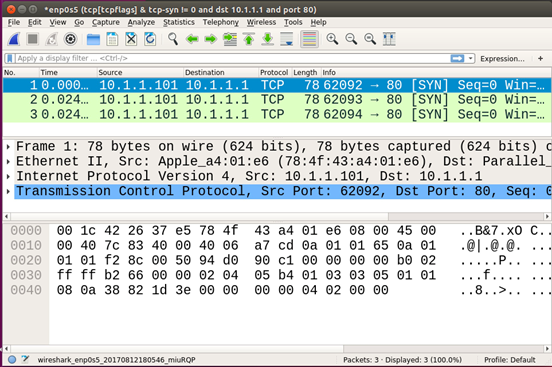
Figure 5: Packet capture when persistent connections=3
To analyze the maximum number of HTTP requests that can be served on one TCP connection, edit the Apache configuration file and define the directive value as Max Keep Alive Requests 100. Restart the web server and the Wireshark capture, and reload/refresh the web page in the Firefox browser (which is still configured to use 3 concurrent persistent connections). The Wireshark capture will show the setup of 3 TCP connections. Repeatedly refresh this web page every 1 or 2 seconds, and observe that on the fourth refresh, the Wireshark capture will show the setup of 3 new TCP connections (as shown in Figure 6). In this capture, the first 3 connections are started at times00:00:00.000000s, 00:00:00.021872, and 00:00:00.022212. On the fourth successive refresh, the 3 new connections are started after about 7 seconds at times00:00:07.53047s, 00:00:07.55419s, and 00:00:07.55438s.
To understand this behavior, recall that each web page results in 11 URL accesses. Thus, the connection will be closed after serving 11 new web requests on a single TCP connection (because of the directive Max Keep Alive Requests 11), and a new TCP Connection will be established. The Firefox browser initially establishes 3 concurrent TCP connections, which suffices for the first three web accesses. After serving these 33 web requests (a total of 1+10 requests on each TCP connection), the three connections will be closed and three new connections will be established8.
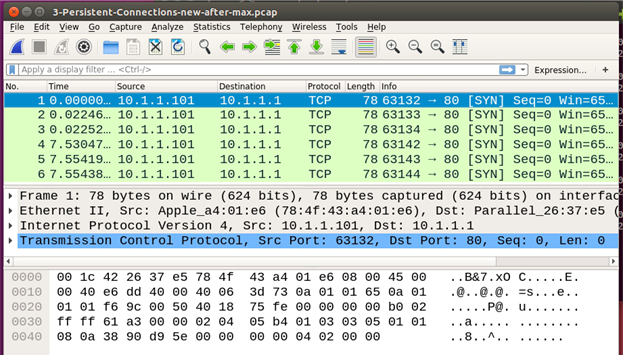
Figure 6: Capture of new connections created when the Max Keep Alive Requests limit is reached
As mentioned earlier, the web server’s response headers contain a count-down of the number of requests that can be serviced with the current TCP connection. To observe this, restart the Wireshark capture with a filter to capture all packets that are exchanged between the client and the server (e.g.,host 10.1.1.101 and host myweb.com and port 80). Select any TCP packet, right click on it, and select Follow → TCP Stream as shown in Figure 7. This opens a window which shows all HTTP requests served on this TCP Connection. Observe that the value of the max field in the HTTP header Keep-Alive decreases for each subsequent request, and the last request has the response header Connection: Close. To develop a better understanding of persistent connections, repeat the experiment with this setup:
i. Create a simple web page with n embedded URLs.
ii. Configure the Firefox browser with the number of concurrent persistent connections to c.
iii. Configure the web server with Max Keep Alive Requests M.
iv. Configure Wireshark to record all TCP SYN packets from the client browser to the web server when the web page is loaded, and let this number be t.
Predict the relationship between the four values n, c, M and t and test your prediction empirically using the strategy presented here. Repeat this exercise with other browsers as well.
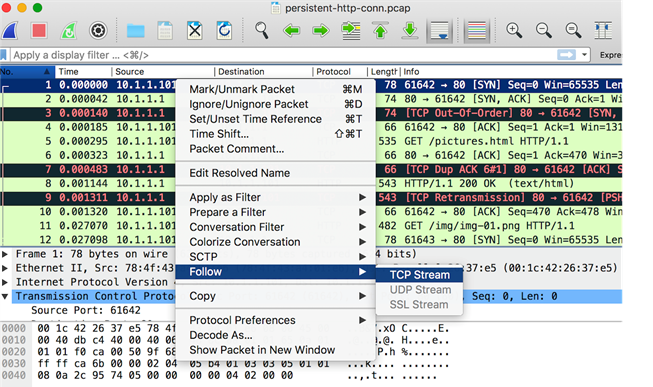
Figure 7 : Identify ingall HTTP Request on a TCP Connection
The webpage pictures.html that we have defined has only 10 images embedded in it. A typical web page contains many more images [9], and several of these images may be common across multiple pages associated with a particular website. When multiple such web pages from the same website are accessed, the browser accesses the common images repeatedly from the same URL. Images can be large, so downloading the same image repeatedly not only wastes network bandwidth and computing resources for both the client and the server, it also delays the display of the web page. To overcome these inefficiencies, images are typically cached by browsers. However, before a browser can use an image from its cache, it must ensure that this image has not changed on the web server since the time it was cached.If the image has changed, the browser must replace the outdated image in its cache with a freshly downloaded version of the image. However, if the image has not changed, the browser can display the content from its cache rather than fetching it again from the web server, significantly improving the web page display performance.
The HTTP header Cache-Control is the key header that controls how cached content should be used by the browser and when this content expires (i.e., when it needs to be refreshed). One of the fields of this header is max-age, which defines the maximum cache validity duration (in seconds)9. The value associated with max-ageis relative to the time when the request is made. Once these many seconds have elapsed, the cache becomes invalid and needs to be refreshed. The Cache-Control header has several other fields. The field public indicates that any entity (e.g., a proxy server in the path between the client and the web server) can cache and use this content. In contrast, the field private indicates that this content can be cached only by the client, and should not be cached by any intermediary proxy server. The field no-cache indicates that the web client can cache this content (despite the name of this field), but this content must be revalidated with the web server before the browser renders it. The field no-store indicates that the content cannot be cached at all. A flowchart depicting the use of these Cache-Control fields is shown in Figure 8. Further details can be found in the following references:[6], [8],[10].

Figure 8: Processing of Cache-Control fields
In addition to Cache-Control, the HTTP headers relevant to understand caching areIf-Modified-Since and If-None-Match in the HTTP request, as well as ETag and Last-Modified in the HTTP response. The Last-Modified header should not be confused with the Date header in the response, which only indicates the date and time at which this response was sent by the web server. (It has no bearing on when the content was created or updated.) An example of an HTTP request with its accompanying headerswhen fetching an image is shown in Listing 2. The corresponding HTTP response with headers from the web server is shown in Listing 3. In this case, the HTTP status 304 Not Modified indicates that the browser should use the content from its cache. We will now understand how the browser and the web server collaborate to reach this decision.
Listing 2 : A typical HTTP Request header for a cached image
| GET /img/img-09.jpg HTTP/1.1 Host: 10.1.1.1 User-Agent: Mozilla/5.0 (Macintosh; Intel Mac OS X 10.12; rv:54.0) Gecko/20100101 Firefox/54.0 Accept: */* Accept-Language: en-US,en;q=0.7,hi;q=0.3 Accept-Encoding: gzip, deflate Referer: http://10.1.1.1/pictures.html DNT: 1 Connection: keep-alive If-Modified-Since: Sat, 05 Aug 2017 16:44:12 GMT If-None-Match: “5009-5560452ce2725” Cache-Control: max-age=0 |
Listing 3: The HTTP response from the web server for the cached image requested by the browser
| HTTP/1.1 304 Not Modified Date: Sun, 06 Aug 2017 10:12:36 GMT Server: Apache/2.4.18 (Ubuntu) Connection: Keep-Alive Keep-Alive: timeout=5, max=7 ETag: “5009-5560452ce2725” |
First, consider the case when the browser requests the web server for some resource for the very first time. The web server’s response will contain the header Last-Modified followed by the date and time at which this resource was updated/modified on the web server. The browser stores this Last-Modified date while caching the contents of this resource. When the browser needs to reload this cached resource, it makes an HTTP request with the stored value of Last-Modified in the If-Modified-Since request header. The web server compares the date in the request header with the last modification date of the requested resource. If the latter date is earlier, the web server does not send the contents of the requested resource but instead sends the HTTP Response with status code value 304 (Not Modified) to inform the browser that it can safely render the resource from its cache.
To gain hands-on experience with caching, open the web developer tools in Firefox (Tools ->Web Developer ->Network). Enter the URL corresponding to a previously cached resource (e.g.,http://myweb.com/img/img-05.jpg). Under the Header column, select Raw headers to show both the request and response headers (as shown in Figure 9).
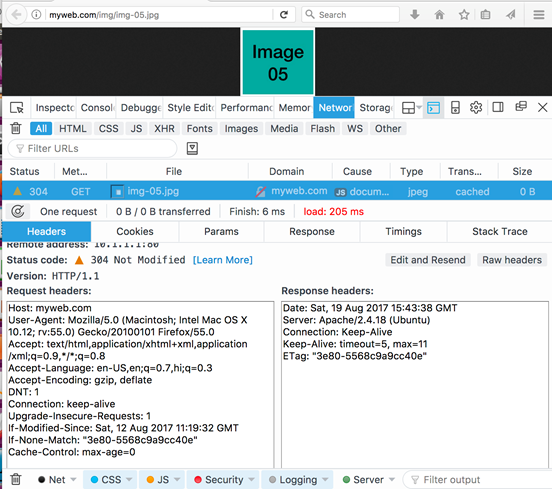
Figure 9: Request and Response headers when cached content is accessed
The request contains the header If-Modified-Since: Sat,12 Aug 2017 11:19:32 GMT. The web server responds with the HTTP Status code 304, so the browser displays the cached image. To see how this header changes when the cached content becomes outdated, change the modified date of this image on the web server (e.g.,sudo touch /var/www/html/img/img-05.jpg). When the page is refreshed, the web server recognizes that the document’s modified date is later than the value received in the request header If-Modified-Since. In this case, the web server responds with the full image content with status code 200 OK.
A complication arises when a resource on the web server is modified by replacing it with a version that was created earlier. In this case, the methodology described above would cause the browser to render the cached content, despite the modification made to the resource. To deal with such situations, the HTTP protocol provides the ETag header which is a unique signature associated with the resource. The browser stores the ETag value alongside the cached content, and sends this value in the request header. For example, the request in Figure 9 includes the header If-None-Match: “3e80-5568c9a9cc40e”. The web server’s response includes the same value in the ETag header. If the resource had been modified, the web server would assign it a different ETag, and would therefore response with the updated resource and a status code in the category {2xx}.
The Content-Length header in the web server’s response specifies the total response size, and by default the browser renders the content only after it is received in its entirety. When a web request results ina large response size (e.g., a high-resolution image, a large table in response to a database query, etc.), it may take significant time for the client to receive the full content. During this time, the browser will not display any partially-received content. Thus, even though the browser and the web server are actively communicating, the user may feel that the web server is unresponsive. To enhance the user experience, it is desirable to render partial content when possible. For example, the initial rows of image pixels or the first few query results could be displayed.To support this type of continuous content rendering, HTTP/1.1 supports the concept of chunk-based transfer, specified with the header Transfer-Encoding: chunked. This header is infrequently used in HTTP requests, but it is commonly used in HTTP responses.
The content is sent as a series of chunks, as shown in Listing 4. The size of the chunk is specified as a hexadecimal value on a line by itself, followed by the chunk data, followed by an empty line. The final chunk is sent with size 0 to indicate the end of the chunk transfer.When the web server sends both the Content-Length and Transfer-Encoding: chunked headers, the former is ignored. Such a response is typically generated by application programs invoked by the web server to generate dynamic content.
Listing4: An example of a chunk based response
| HTTP/1.1 200 OK : Transfer-Encoding: chunked :
13 A 11 0 |
The HTTP/1.1 protocol also provides another mechanism to support partial content delivery where the client can make requests for specific segments of a particular resource by specifying a range of bytes. For example, in response to the request headerRange: bytes=0-199, the web server would send only first 200 bytes of the requested resource. Similarly, the request headerRange: bytes=200-299 fetches the 100 bytes data of starting from the offset 200. An example of the partial response to such a request is shown in Listing 5. Note that the status response code is 206 Partial Content instead of the usual 200 OK. The response header Content-Range: bytes 200-299/873indicates the specific range of 100 bytes of data being sent, out of a total size of 873 bytes. This partial response is particularly very useful if the network connection fails while downloading a large file, because the client can resume the download from the point of failure rather than starting from the beginning.
Listing 5: The response header for partial contents
| HTTP/1.1 206 Partial Content Server: Apache/2.4.7 (Ubuntu) : Accept-Ranges: bytes Content-Length: 200 Vary: Accept-Encoding Content-Range: bytes 200-299/873 Content-Type: text/html |
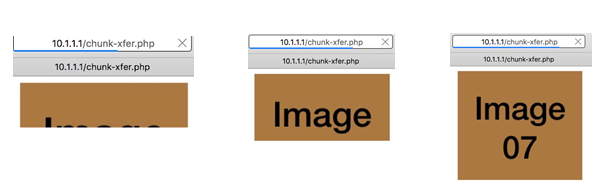
A simple way to experience chunked transfer is to create a PHP program that introduces artificial delays to emulate network latency, as shown in Listing 6. Store this code in a file named chunk-xfer.php in the document root on the web server. When the URL http://10.1.1.1/chunk-xfer.php is accessed, the image will be rendered incrementally. Figure 10 shows three snapshots as the image is partially rendered with chunk transfer encoding. The PHP code uses chunks of size 1000 bytes (hex 3E8). To verify this, analyze the response packets with Wireshark capture.
Listing 6: PHP code to demonstrate the use of Transfer-Encoding: chunked
|
$file = ‘img/img-07.jpg’; if (is_file($file)) { header(‘Content-Type: image/jpeg’); header(‘Transfer-Encoding: chunked’); $chunkSize = 1000; handle=fopen(handle=fopen(file, ‘rb’); while (!feof($handle)) { buffer=fread(buffer=fread(handle, $chunkSize); # send chunk size in hex, chunk content, new line echo sprintf(“%x\r\n”, $chunkSize); echo $buffer; echo “\r\n”; ob_flush(); flush(); usleep(500000); # emulate network latency } fclose($handle); exit; } else { header(‘Content-Type: text/html’); echo “\r\nNo picture available for $file\r\n”; } > |
Figure 10: An image being displayed with chunk transfer encoding
To use the Range request header, use the curl tool10 to make the request for partial chunks. On the web server, create a simple page (e.g., mypage.html) of size N bytes. For concreteness, suppose N = 500. To access this file in three chunks, issue the following commands (in any order) from the client terminal:
i. curl –H “Range: bytes=0-199” –o chunk1.html
http://10.1.1.1/mypage.html
ii. curl –H “Range: bytes=200-399” –o chunk2.html
http://10.1.1.1/mypage.html
iii. curl –H “Range: bytes=400-” –o chunk3.html
http://10.1.1.1/mypage.html
The three chunks can be combined into a single document with the following command:
cat chunk1.html chunk2.html chunk3.html > response.html
Verify that the file response.html has precisely the same content as mypage.html.
We have discussed three different performance mechanisms that are supported by the HTTP protocol to improve the performance of web applications and enable better user experiences. The mechanism of multiple persistent connections is used by default in all modern web browsers. The HTTP/2 protocol makes use of only one persistent connection, yet it achieves better performance than HTTP/1.1 for reasons we will discuss in subsequent articles. The mechanism of caching contents saves bandwidth and network latency, especially when web pagescontain large multimedia content. The mechanism of transfer chunk encoding provides a more engaging user experience by rendering content as it is received. Further, large content can be downloaded in chunks so that, in case of a network failure, the download can be resumed from the point of last failure. As all these performance mechanisms are used to deal with issues of poor network latency, which we will measure and discuss in detail in the next article.
[1] RFC 1945, “Hyper Text Transfer Protocol – HTTP/1.0”, Network Working Group, Informational, Berners-Lee(MIT), Fielding (UC Irvine), Frystyk (MIT), May 1996.
[2] RFC 2068, “Hypertext Transfer Protocol – HTTP/1.1”, Proposed Standard, Fielding (UC Irvine), Gettys, Mogul (DEC), Frystyk, Berners-Lee (MIT), Jan 1997.
[3] RFC 2616, “Hyper Text Transfer Protocol – HTTP/1.1”, Network Working Group, Request for Comments 2616. Fielding (UC Irvine), Gettys (Compaq), Mogul (Compaq), Frystyk (MIT), Masinter (Xerox), Leach (Microsot), Berners-Lee (MIT), June 1999.
[4] RFC 7540, “Hypertext Transfer Protocol Version 2 (HTTP/2)”, IETF, Proposed Standard, Belshe (Bitgo), Peon (Google), Thmoson (Mozilla), May 2015.
[5] Wireshark – The Network Protocol Analyzer, https://www.wireshark.org/#learnWS”https://www.wireshark.org/#learnWS, Accessed Aug 2017.
[6] Kurose, Ross, “Computer Networks: A Top Down Approach” 7th edition, Pearson Education Inc, 2016.
[7] Apache Web Server https://httpd.apache.org/docs/2.4, accessed July 2017.
[8] https://developers.google.com/web/fundamentals/performance/optimizing-content-efficiency/http-caching?hl=en, Accessed August 2017.
[9] http://httparchive.org/trends.php, accessed August 2017.
[10] https://www.mnot.net/cache_docs/, accessed August 2017.
[11] http://acc.digital/experiential-learning/, The first article on experiential learning of Networking Technologies, Jun 30, 2017, ACCS India.