
With the rapid increase in the volume of e-commerce, the security of web-based transactions is of increasing concern. A widespread but dangerously incorrect belief among web users is that all security issues are taken care of when a website uses HTTPS (secure HTTP). While HTTPS does provide security, websites are often developed and deployed in ways that make them and their users vulnerable to hackers. In this article we explore some of these vulnerabilities. We first introduce the key ideas and then provide several experiential learning exercises so that readers can understand the challenges and possible solutions to them in a hands-on manner.
NOTE: Several readers have requested access to the source code described in these series of articles. We are delighted at this response from our readers, and we will be making all our code available for this article at this link: https://github.com/rprustagi/EL-Understanding-Web-Security.git. The code and example samples for earlier articles is going to be accessible at https://github.com/rprustagi/Experiential-Learning.git.
From its inception, the Internet has aimed to enable end-users to quickly and easily access information by interconnecting computers storing this information. The Internet’s design is thus based on an open-architecture: individual networks can be separately designed, but they are connected to other networks using open protocols. Initial implementations led by the academic fraternity and research labs focused on information exchange – security was less of a concern at that time. When web-based information dissemination (via news, email, etc.) took off in the 1990s, security concerns centered on malware detection and prevention. It was not until the advent of web-based commerce that security concerns became critical.
The first version of the web security protocol Secure Sockets Layer (SSL) was developed by Netscape in 1994, which aimed to provide secure communication between web servers and web browsers. Working at the Transport and Session layers of the OSI 7-layer model, SSL can support higher layer (application) protocols such as Hyper Text Transfer Protocol (HTTP) [1] , File Transfer Protocol (FTP) [2] , Telnet [3] , etc. The SSL protocol supports several encryption schemes, with provisions to support new encryption algorithms in the future. SSL subsequently evolved to Transport Layer Security (TLS) [4] , the current version of which is TLS v1.2 [5] (TLS v1.3 in presently in the draft stage). When SSL/TLS is the underlying protocol used by HTTP for web communications, it is called HTTPS [6] .
It is important to understand the meaning of – and the difference between – three key terms related to security: authentication, confidentiality and integrity. As a concrete example, suppose person P uses HTTPS to access a website W to carry out an e-commerce transaction T. To begin with, person P would like to authenticate website W – i.e., P wants to be certain that his/her browser is communicating with website W, and not with some other website purporting to be W. To ensure this, HTTPS requires the web server to provide a website certificate containing the website name W, the validity period of the certificate and the identity of a well-known Certificate Authority (CA) which has digitally signed this certificate. Modern browsers are preconfigured to accept web certificates issued by trusted CAs such as Verisign, Thawte, GoDaddy, etc. and their sub-agents. After accepting the certificate, person P’s browser verifies that the certificate is still valid and that the website name in the certificate is identical to what person P entered in the browser. If either of these conditions fails, the browser warns person P that it cannot authenticate website W.
Next, P would like to ensure that sensitive data associated with transaction T (password, bank details, etc.) remains confidential – i.e., the raw data should not be accessible to any third party (such as others in person P’s local network, IT staff, or intermediate nodes in the network) while it is being transmitted to W. TLS enables W and P’s browser to create a common session key, which is then used to encrypt and transmit all messages in that session. Even if this data is captured, it cannot be decrypted (except by brute force over an infeasible time-span of several million years using the fastest supercomputers available). Lastly, P would like to ensure the integrity of the data transmitted to and from W – i.e., it should not be possible for any third party to tamper with the data. Once again, HTTPS ensures this.
At this point, you may believe that HTTPS is secure against all types of attacks, such as Man In The Middle (MITM) [7] . In fact, security can be compromised in several ways, and we shall see that MITM attacks are possible. Some vulnerabilities arise due to bugs in the implementation of TLS and HTTPS, but these are typically exploitable by experts only for a limited time – flaws can be quickly patched once they are found. The vulnerabilities we describe below are much easier to exploit and are often hard to eradicate, making them particularly worrisome.
We will not cover general web attacks such as Cross Site Scripting, Injection attacks, Distributed Denial of Service attacks, etc. in this article as these are not specific to HTTPS.
Unfortunately, many sites serve content using HTTPS but do not deploy SSL certificates correctly. A website certificate can be invalid for several reasons: it may have expired, it may refer to an outdated website name (the website’s name may have changed after the certificate was deployed), a certificate for a website domain may be used for subdomains, or the browser may consider the certificate’s CA untrustworthy (developers often use self-signed certificates while testing a website, but these will be rejected by users’ browsers). Obtaining a certificate from a well-known authority can be expensive, and it requires additional procedural work which also adds to the cost.
A common vulnerability relates to the way in which most web client browsers handle these invalid website certificates: they display “invalid certificate” warnings and typically offer an easy option to ignore these warnings (known as a “click-through option”). Attackers count on the fact that many users will take this easy option and will therefore be compromised.
An additional challenge arises when a user behind a proxy connects to a website using HTTPS. When the user enters the URL, the local router/firewall will redirect the request to the proxy server which will respond with an authentication web page. Next, when the proxy server establishes an SSL connection and responds with the web page, the SSL certificate will contain the website name of proxy server (which will be different from the website entered by the user). The browser will detect this discrepancy and will display an “invalid certificate” warning.
In this case, careful users may avoid proceeding further even though the website is legitimate. The proxy server can also be setup to simply reject the connection. This will result in a time out, which the user will perceive as a broken network connection. Since both these options result in a poor experience for the user, the network can allow direct access to websites on HTTPS without the proxy server. However, this could lead to security loopholes and will likely violate the security policies of the local network. Thus, most network setups with proxy servers require that users start browsing with HTTP and websites cannot stop supporting HTTP-based access.
Have you tried accessing a website that uses HTTPS without typing the https:// prefix? If you enter acc.digital [8] or flipkart.com in your browser, it will first assume the default http:// prefix. Next, your browser will be automatically redirected to the website with the https:// prefix. This is very convenient, but it is potentially a vulnerability. Thus, it is important to understand the exact sequence of steps involved.
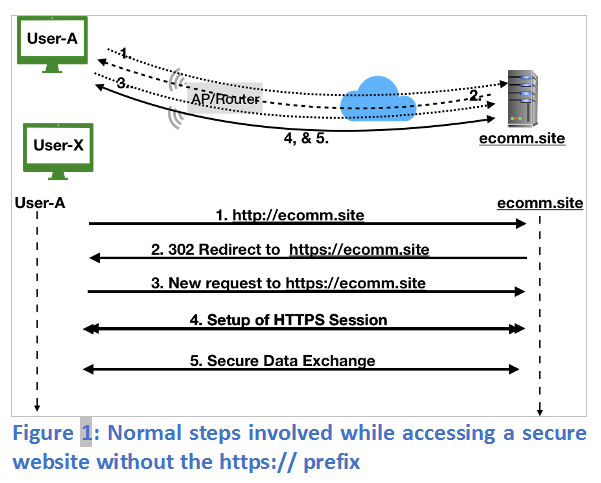
In Figure 1, User A types http://ecomm.site (or just ecomm.site) which uses HTTP to communicate with the website (message 1). To ensure security, the website redirects the browser (HTTP status code 302) to use HTTPS (message 2). The browser re-establishes communication with the website using HTTPS (message 3), which establishes a secure session (message 4) for secure two-way information exchange (message 5).
Since the first request is over HTTP, it is possible to launch a MITM attack where the two parties (in this case User A and the website) believe that they are directly and securely communicating with each other whereas in fact a third party is monitoring and/or modifying the data being exchanged between them. One such attack is shown in Figure 2.
The attacker (User X) first becomes the “man in the middle” by using Address Resolution Protocol (ARP) spoofing [9] to alter User A’s ARP table to map the next hop router’s IP address to User X’s MAC address, and to similarly alter the router’s ARP table to map User A’s IP address to User X’s MAC address. (To do so, User X can use a tool such as dsniff.) Now, whenever User A sends a packet to the router or the router sends a packet to User A, the destination MAC address filled at the link layer corresponds to User X. Hence, unknown to User A and the router, these packets are delivered to User X.
To maintain the appearance of a normal connection, User X can forward these packets to the intended target, but it can do so selectively and can record all communications (e.g., using tcpdump). An exercise to carry out ARP spoofing and capturing such data in a controlled environment is described in Exercise 6.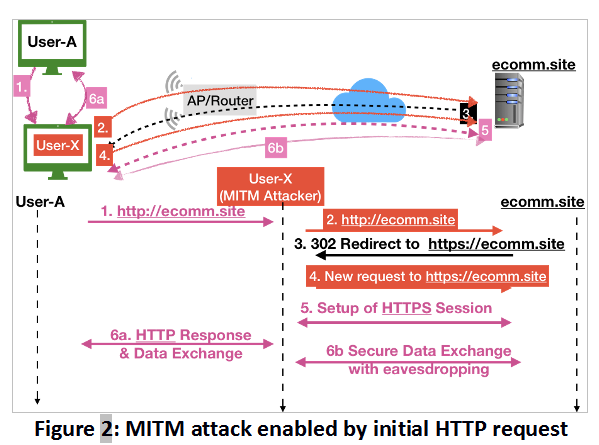
Let us now examine the attack shown in Figure 2. As with our previous scenario, we assume that User A types http://ecomm.site (or just ecomm.site). User X intercepts this request (message 1) and forwards it to the website (message 2) but, crucially, does not forward the redirect request (message 3) to User A. Instead, User X initiates an HTTPS communication with http://ecomm.site directly (message 4). Note that the website has no idea whether User A initiated this HTTPS request – it simply sets up the HTTPS session (message 5).
At this point, User X uses a tool such as sslstrip [10] to manipulate the website response by rewriting all references to HTTPS links with HTTP and sends this modified webpage to User A (message 6). Since the webpage has a very similar look and feel to the original webpage, User A is unlikely to notice that this connection is HTTP (e.g., by noting the absence of the lock icon for HTTPS near the URL bar in the browser). Believing that the connection is secure, User A now enters sensitive information (message 6a), which User X can view (since it is unencrypted) and record. User X can also forward this information securely to the website (message 6b) and continue to eavesdrop on the ostensibly secure session that follows.
Let us consider some of the ways in which the MITM attack described above could have been prevented.
i. User A could have explicitly entered the https:// prefix or configured his/her browser to forcibly use HTTPS for selected websites [11] . However, many web users are unaware of these issues and the steps needed to prevent them, and it is not practical to educate all Internet users. Other web users (including the authors of this article) find themselves skipping this important step, despite being fully aware that the simplest way to avoid eavesdropping or MITM attacks is to use HTTPS and not HTTP when accessing websites that require users to input sensitive information.ii. Before entering sensitive information, User A could have ensured the presence of the lock icon. Once again, this assumes that users are sensitized to such issues.
iv. User A (or the IT staff in charge of User A’s network) could regularly monitor the network to ensure that ARP spoofing does not occur. This assumes adequate technical knowledge andresources (including time) on the part of User A or the IT staff, which is usually lacking in many contexts (e.g., small/medium-sized businesses).
v. The website could entirely disable serving HTTP requests and force users to use HTTPS. It is very unlikely that businesses would adopt such an approach because it risks losing clients. For instance, User A
in Figure 1 would be unable to access the website and may thus abandon this business. Further, when the web server handles all URLs using HTTPS, performance can become an issue (especially when all the encryption is carried out in software).vi. The website could attempt to thwart MITM attacks, for instance by injecting web pages with encoded content to verify that HTTPS is indeed being used. (If not, the website could block the interaction and attempt to warn the registered user of the possible attack.) However, this complicates website development and requires suitably sensitized and experienced developers. Further, if User X is sufficiently determined, he/she can detect and remove the HTTPS checks before presenting the modified page to
User A.Thus, no approach is entirely satisfactory.
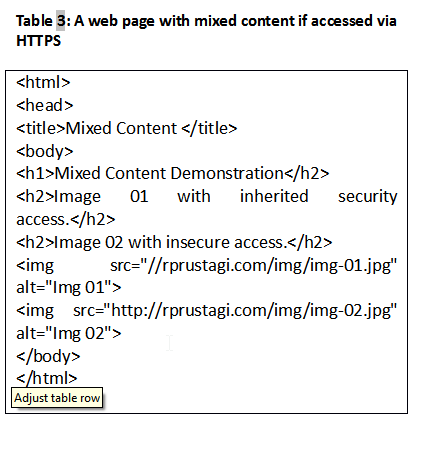
To render a typical web page, several embedded objects need to be fetched [13] . Web developers sometimes hard-code these URLs into web content using HTTP instead of HTTPS (e.g., content fetched from other domains that do not support HTTPS). Further, websites often generate dynamic content via database lookups, executing external programs, etc. This dynamic content may also hard-code HTTP links. Converting such hard-coded links to HTTPS may require changes to external code, which is often infeasible.
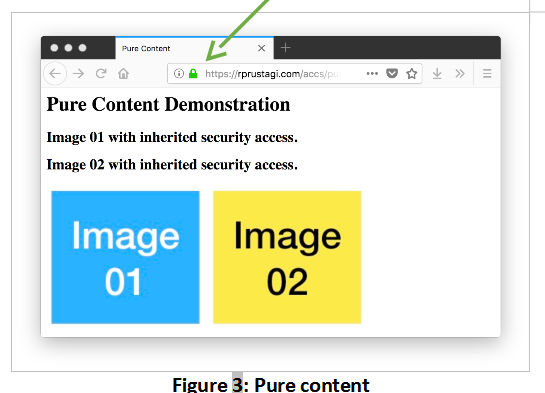
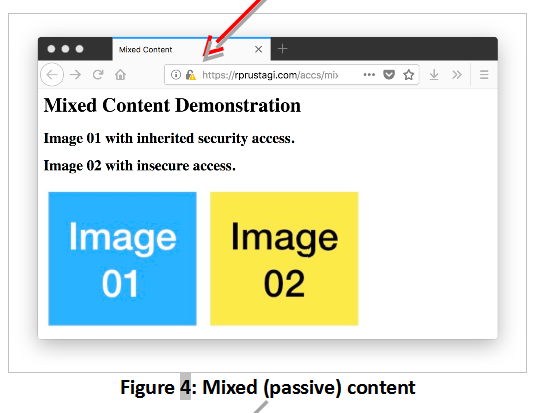
When HTTPS is used to access such a web page, we say that it has mixed content [14] [15] . As we shall see, since the entire communication does not use HTTPS alone, such a page is vulnerable to tampering [15] . Modern browsers indicate whether HTTPS content is mixed (i.e., potentially unsecure) or pure via an icon near the address bar. Table 1 shows these icons for Firefox [16] .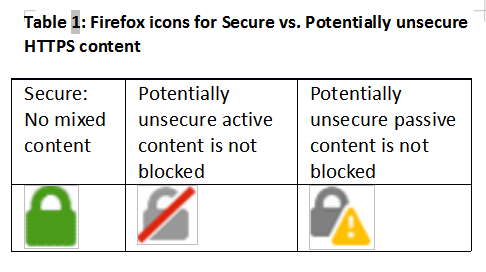
To view the difference between pure and mixed content in your browser, access the following links:
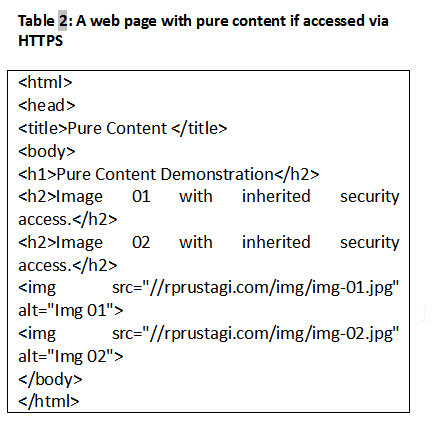
The HTML code for these pages are in Table 2 and Table 3 respectively. The key difference is that the code in Table 3 hardcodes the prefix http:// for Image 02. The prefix for Image 01, in contrast, is inherited from the protocol prefix used to access the web page. If these pages are accessed with the http:// prefix, the browser will show no difference other than in the page title. However, if these pages are accessed with the https:// prefix in Firefox, the page with pure content will show a green icon (see Figure 3) whereas the page with mixed content will show a gray lock with a warning symbol (see Figure 4).
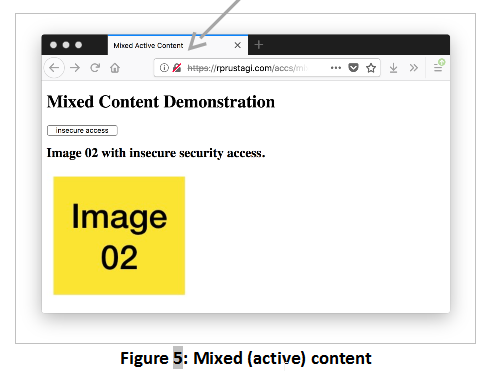
Images in webpages are considered passive elements. When a webpage has active elements (e.g., scripts that generate content upon execution) that are invoked insecurely, the browser displays a different icon. For instance, when https://rprustagi.com/accs/mixed-active.html is accessed in Firefox, the lock icon with a crossed gray image and a red line is displayed, as shown in Figure 5.
The active content associated with the button labeled “Insecure access” is fetched via HTTP. Users can choose whether to allow or block such active content. In the above example, the button would work fine when protection is disabled (the browser would show the gray lock icon with the red line), but it would be blocked when protection is enabled (the browser would show the green lock icon). In the former case, an attacker can hijack the HTTP access and replace the script with code that performs malicious actions. Thus, it is safer to block this content, and instructions to do so are available [16] .
It is thus clear that web developers must ensure that embedded elements inherit the protocol scheme or use HTTPS as the default. The reader is encouraged to carry out to develop a better understanding of Mixed Content.
Most websites that offer services (e-commerce, email, search engines, etc.) are eager to track their users, usually via cookies. While such a website is under development, developers typically work with HTTP-based setups and enable cookies for both HTTP and HTTPS. When this website is deployed with a proper SSL certificate, developers may miss re-configuring user-tracking cookies only for HTTPS connections.
If a user enters the website name without the https:// prefix, the browser makes an HTTP request and also sends all stored cookies for this website. Since HTTP is a clear text protocol, the associated cookies (which may contain user credentials, session identifiers, etc.) can be stolen easily by an attacker snooping on the user’s traffic.
To understand this cookie security mechanism, access the following URL:
https://rprustagi.com/accs/scookies.php
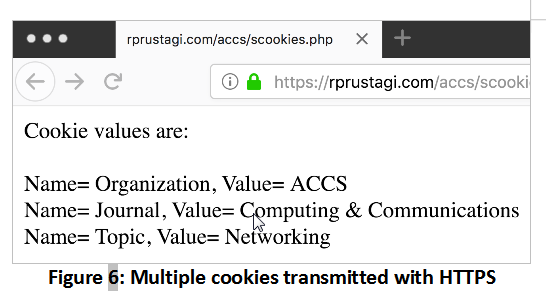
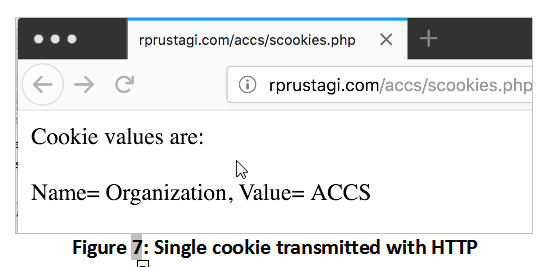
The PHP code for this page sets three cookies as shown in Table 4.
Setting the sixth parameter to true creates a secure cookie that can only be used via HTTPS. When this sixth parameter is absent or is set to false, the cookie can be used for both HTTP and HTTPS access. Setting the seventh parameter to true means that this cookie is applicable only for HTTP-based access, and not for other accesses (e.g., Ajax calls).
The code in Table 4 sets the first cookie for both HTTP and HTTPS, and sets the second and third cookies for HTTPS access only. These latter cookies will not be sent if the webpage is accessed via HTTP. When this webpage is first accessed using HTTPS, all three cookies will be set. When the page is again accessed via HTTPS, the browser will send all three cookies. However, if the same URL is accessed via HTTP, the browser will send only the first cookie. This simple webpage displays the cookie values received with HTTPS (Figure 6) and HTTP (Figure 7).
Thus, web developers must ensure that cookies that hold sensitive user information must be properly secured. Further, to avoid cross-site scripting attacks, the cookie attribute HttpOnly should also be used (as shown for the third cookie in the above example). To gain a hands-on understanding of this concept, the reader is encouraged to try out Exercise 3.
Web servers can force browsers to use HTTPS (even if the user does not enter the https:// prefix explicitly) by making use of the HTTP header Strict-Transport-Security, also known as HSTS. The web server needs to be configured to communicate this header in its response when accessed using HTTPS. Once the browser receives this header in the response, it stores this information in its cache for the duration specified in the header. The browser will subsequently always use an HTTPS connection for this website, even if the user does not enter the https:// prefix explicitly.
HSTS is especially useful in public spaces such as cafes, airports, railway stations, etc. In such places, a user is likely to access the internet using a shared network, such as a Wi-Fi (either open access or using [17] ). Even though the Wi-Fi link layer communication (using WPA/WPA2) may be encrypted, the higher-level traffic at IP and TCP is susceptible to MITM attacks. As described earlier in this article, such an attack could succeed if the user tries to access a website via HTTP.
With HSTS enabled, and assuming the user has previously accessed this website via a trusted network, the browser will initiate the communication on the public network using HTTPS only, thwarting the MITM attack.
Several popular websites including Facebook, Amazon and Twitter enable the HSTS feature in their responses. However, prominent e-commerce websites (e.g., www.flipkart.com), financial institutions (e.g., SBI, ICICI, HDFC bank), mutual funds registrars (e.g., www.camsonline.com), and academic institutes (e.g., www.vtu.ac.in and www.iisc.ac.in) do not implement HSTS. Airtel (www.airtel.in) does set the HSTS header, but with max-age=0, making it ineffective.
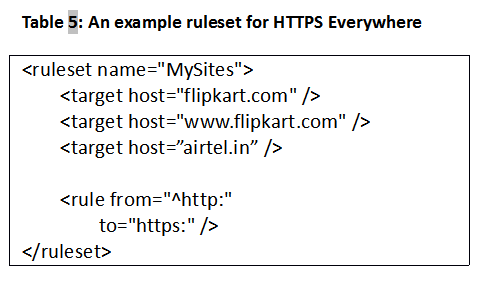
Users who often access such websites over public networks can configure their preferred browsers to always communicate using HTTPS only. For instance, the plugin ‘HTTPS Everywhere’ [18] allows users to create rulesets for specific websites, as shown in Table 5.
To enable a website to send the HSTS header in the response, we need to make certain changes in the configuration files. For the Apache web server, we enable the header module (sudo a2enmod headers), make the entry “Header always set Strict-Transport-Security "max-age=86400; includeSubDomains" in the file ssl-default.conf under the VirtualHost section, and restart web server. This will set the life of HSTS to be 1 day (86400 seconds) and applicable to all subdomains of the website domain. Typically, the lifetime of HSTS should be a much higher value and should be set as per requirements. The value for 1 year would be 31536000 (= 86400 * 365) seconds. However, it should be noted that as per RFC 6797 (sec 12.1) [19] , browsers will ignore this setting for self-signed certificates, since such certificates cannot be fully trusted. To verify that the web server is sending the HSTS header, use wget –d –no-check-certificate https://mywww.com (where mywww.com is the experimental web server where you have enabled HSTS in the Apache configuration file). The output should contain the HSTS header. Similarly, using developer tools in a browser, you can find the HSTS header under the HTTP protocol response headers. To gain practical experience of working with the HSTS header, the reader is encouraged to try Exercise 4.
Browsers can further use HTTP Priming [22] to determine whether a website supports HSTS. For any website to be accessed using HTTPS, it first makes a HEAD request to verify whether the website supports HSTS. If so, the browser then uses HTTPS to access the website instead of HTTP.
The web community has explored and implemented many other options to enable secure communications. This has resulted in defining new Secure HTTP headers [23] that provide specific support for specific issues. Some of these header options are discussed below.
A modern browser trusts several certificate authorities. Suppose that an attacker compromises any one of these certificates. The attacker can generate a valid certificate for some target domain (e.g., google.com), modify the DNS entries for a network and direct traffic intended for this target domain to the server set up by the attacker to spoof the target domain. A user’s browser will trust this server since the website domain is signed with a trusted CA. The user can thus be tricked into revealing sensitive information to the attacker. HPKP is a mechanism that is designed to prevent such a scenario. This mechanism tells the browser which CA certificates are trustworthy. This mechanism is Trust On First Use (TOFU). The first time a browser accesses a web server, the web server informs the browser with a special header (Public-Key-Pins:) about the public keys that belongs to the CA, and the browser caches this information. The header attribute pin-sha256 provides the Base64 encoded values of a public key. The header has other optional attributes such max-age, includeSubDomains, report-uri etc. If in future, such a webserver provides a different public key for the CA, the browser recognizes the error and warns the user, thus helping to prevent an attack.
Websites today are prone to attacks, and the most common form is some variation of an injection attack. This especially occurs on websites which interact with users and expect them to provide inputs via forms, comments on blogs, social media, etc. The attacker makes use of this input interaction facility to inject malicious contents which results in the hacking the website, stealing user information, etc. Content Security Policy (CSP) [26] is a security mechanism that enables the website to prevent such injection attacks, e.g. cross site scripting (XSS) attack. The CSP mechanism is implemented via HTTP response headers. This mechanism acts as a security layer in the browser by helping it determine whether some dynamic content is dangerous and should be blocked from execution. CSP specifies which origins (web domains) are allowed to access what type of resources. A detailed list of CSP attributes are described in [26] .
Below we discussed few of these. To allow default resources such as scripts, style sheets, images from the same domain belonging to the web page, the attribute can be set as default-src ‘self’; This attribute tells the browser that all contents from this parent website is safe and can be rendered. The CSP attribute value script-src self https://code.jquery.com; enables loading scripts from the external website code.jquery.com as well as from the current domain. Using the default-src ‘self’; is assumed to be safe in general since the content is coming from same domain.
For a website, the value of CSP attributes are determined by the devops (development and operations) team which should define the policy for content security. This team must modify the web server configuration to send the requisite CSP header in web page responses. A typical example of enabling CSP in Apache defaults to none, but allowing images, style sheets and scripts from the existing domain would require following entry in the configuration file:Header set Content-Security-Policy “default-src ‘none’; script-src ‘self’; img-src ‘self’; style-src ‘self’”
At times, when the web server is hosted by a third party (e.g., in shared hosting), the devops team may only have access to the website content but not to the configuration files. For such websites, CSP can be supported by using HTML tag in the … portion of the web page. The above example CSP security would be defined in the web page as:

CSP can also be used to partially achieve HSTS functional support by adding the attribute Upgrade-Insecure-Requests to CSP policies. This is not a substitute for HSTS, however, since this does not ensure that future accesses to the website will always be converted to HTTPS. However, incorporating this attribute instructs the browser to access all links of this website with HTTPS. This is a quick way to move to HTTPS without making changes in existing web pages of the website, which can become a humongous task. Experiential exercises with CSP are described in Exercise 5.
There are many more headers to support secure web communication, including X-XSS-Protection (to avoid cross site scripting attack), X-Frame-Options (to avoid clickjacking attack), X-Content-Type-Options (to avoid guessing the content type) [28] etc. We hope we have interested the reader to explore these options [29] as well
In this article, we have explained key issues involved in ensuring secure communications between a user and a website. These are supplemented with several small exercises to augment the reader’s understanding.
Our articles thus far have discussed the fundamentals of HTTP and web communication. We have developed a few simple experimental exercises to better understand HTTP and HTTPS. In the next series of articles, we will explore the working of transport layer protocols, specifically Transport Control Protocol (TCP) and UDP (User Datagram Protocol). Using a similar approach, we will explore the working of these protocols by conducting simple experimental exercises to help consolidate understanding.
All the example webpages as described in these exercises can be downloaded from [21] .
Exercise 1:
a. Find out the IP address of google.com (e.g. using ping –c 1 google.com) and access that IP address using HTTPS in your preferred browser i.e. enter https://a.b.c.d in the browser when a.b.c.d is Google’s IP address. Do you see the Google search page or a warning? Explore why this happens. Repeat this exercise for any other website and understand the way SSL certificates work.
b. For the above IP address (e.g. a.b.c.d), make an entry in your local /etc/hosts file with some domain name (e.g. mydomain.com), as shown in Table 7. Access this new domain name using HTTPS, i.e. https://mydomain.com. Explain why you still get the warning page.
c. Generate a self-signed certificate (see Appendix) for your domain (e.g. mywebsite.com) and deploy this certificate on the webserver. Make a corresponding entry in the client machine and access the website using HTTPS. Explain the reason(s) for the difference from the warnings you observed in first two steps above.
d. Import the certificate file into your browser repository (steps in Table 6) and repeat the step above. You should see the website content without the warning page.
Exercise 2
a. Create web page with secure references to other objects (similar to pure.html in Table 2) which accesses embedded objects without specifying the protocol in the URL. The objects should only be referred with just the path name.
b. Create a web page with insecure references to other objects (similar to mixed.html in Table 3). The objects should be explicitly referred via HTTP protocol.
c. Create a web page that refers to external javascripts explicitly with HTTP (similar to mixed-active.html).
d. Deploy these web pages on your web server.
e. Access these web pages in the (Firefox) browser with HTTPS and analyze the lock icon behavior.
Exercise 3
a. Create a web page based on the code shown in Table 4, and set Secure attribute for some cookies and don’t set this attribute for other cookies.
b. Access this web page in the browser. After the web page is accessed with HTTPS, open the browser preferences (or settings) and look for the values of these cookies. For Firefox, this can be done via Preferences->Privacy & Security->History->Show Cookies. Search for the website and analyze all the attributes. For cookies set with Secure attribute,it should show the value Encrypted connections only under the field Send For:.
c. Access the same web page with HTTP and do a wireshark/tcpdump capture, and analyze the cookies. For HTTP, you should see only those cookies being transmitted for which Secure attribute is not set explicitly.
Exercise 4
a. Enable Apache web server to send additional headers. Run the command sudo a2enmod headers.
b. Configure its configuration file, e.g. ssl default. conf and add the entry “Header always set Strict-Transport-Security "maxage=86400; includeSubDomains" under VirtualHost section.
c.Access this website (e.g. mywww.com) using HTTPS and verify the presence of HSTS header. For example, on client machine, run wget –d – no-check-certificate https://mywww.com. This will dump both the request and response headers and HSTS should be present in response headers.
d. Verify the same in the browser by accessing a website that support HSTS e.g. amazon.in. Close the browser and open the browser again. Explicitly enter the URL with HTTP protocol e.g. http://amazon.in and do a wireshark/tcpdump capture on port 80 and 443 for this website. You should not see any capture on port 80.
e. Repeat the above step for a website that does not support HSTS at all or weakly supports it, e.g. airtel.in. With wireshark/tcpdump, you should see the data capture on port 80.
Exercise 5
This exercise demonstrates use of Content Security Policy. Please note with every change of server configuration files, the server needs to be restarted.
a. Configure the web server with CSP policy as disabling all external links e.g. Header set Content-Security-Policy “default-src ‘none’;
b. Design a webpage containing some images and scripts with embedded link. Access this web page, and neither image should show up nor script should run.
c. Change the CSP polity to allow all from parent web page i.e. set the CSP policy as Header set Content-Security-Policy “default-src ‘self;
d. Access this web page, and both images should be shown as well script should run.
Exercise 6
This exercise simply demonstrates a simple MITM attack using netcat (nc) chat.
Warning: Please note this exercise must NOT be done on any public/institutional/organizational network as it would imply stealing of information, and you may have to face consequences for stealing such information. The authors of this article strongly recommend that you carry out this exercise in a controlled setup (e.g., in your home), and only to develop a better understanding to help you protect your data.
a. Connect 3 machines in a simple LAN network e.g. as shown in figure below.
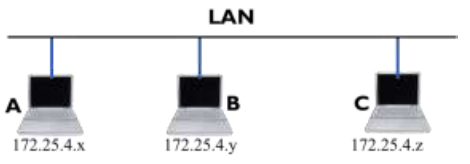
b. Here let A and C be the normal users and B acts as an MITM attacker. Please note down the IP Addresses of A and C as per your network. For the steps below, we will use the IP Addresses as shown in diagram. Please change these values as per your network setup. This further assumes that B is running Ubuntu Linux. A and C can run any OS (e.g. Windows, Mac etc.).
c. Convert B into a router by executing sudo sysctl -w net.ipv4.ip_forward=1.
d. Install ARP spoofing software (package dsniff) on B sudo apt install dsniff
e. Issue ARP spoof command on B for A and C. This assumes Ethernet network interface on B is eth0.
Replace it with the network interface name on your machine B.
sudo arpspoof -i eth0 -t 175.25.4.x -r 175.25.4.z sudo arpspoof -i eth0 -t 175.25.4.z -r 175.25.4.x
f. Run the wire shark on B and capture the traffic between A and C, Use the capture filter as host 175.24.5.x and host 174.24.5.z
g. Run netcat (nc) chat between A and C. The wireshark capture on B should show this chat contents between A and C.
To capture the web traffic as discussed in the article, you need to install sslstrip tool and configure it as per your setup in addition to running ARP spoofing on B.
[1] RFC 2616, “Hyper Text Transfer Protocol – HTTP/1.1”, Network Working Group, Fielding, Gettys et al. June 1999
[2] RFC 959, “File Transfer Protocol”, Networking Working Group, Postel, Reynolds, Oct 1985.
[3] RFC 854, “Telnet Protocol Specification”, Networking Working Group, Postel, Reynolds, May 1983.
[4] RFC 4346, “The Transport Layer Protocol Specifications v1.1”, Network Working Group, Dierks, Rescorla, April 2006
[5] RFC 5246, “The Transport Layer Protocol Specifications v1.2”, Network Working Group, Dierks, Rescorla, August 2008
[6] RFC 2818, “HTTP Over TLS”, Network Working Group, Rescorla, May 2000
[7] MITM. https://tools.ietf.org/html/rfc4949
[8] Advanced Communications and Computing, http://acc.digital/, last accessed on May 26, 2018
[9] RFC 826, “An Ethernet Address Resolution Protocol”, Network Working Group, Plummer, Nov 1982
[10] SSL Striping, https://moxie.org/software/sslstrip/. Last accessed on May 19, 2018.
[11] forceHTTPS https://crypto.stanford.edu/forcehttps/forcehttps.pdf, last accessed May 25, 2018
[12] https://developer.mozilla.org/en-US/docs/Web/Security/Insecure_passwords. Last accessed May 20, 2018
[13] HTTP Trends, http://www.httparchive.org/trends.php, last accessed Feb 13, 2018
[14] Mixed content: https://www.w3.org/TR/mixed-content/
[15] Mixed Content: https://developers.google.com/web/fundamentals/security/prevent-mixed-content/what-is-mixed-content
[16] https://support.mozilla.org/en-US/kb/mixed-contentblocking- firefox.
[17] Wi-Fi Certified WPA2, https://www.wi-fi.org/discover-wi-fi/security. Last accessed May 26. 2018
[18] https://www.eff.org/https-everywhere. Last accessed May 13, 2018.
[19] HSTS : https://tools.ietf.org/html/rfc6797
[20] Analyzing data over Wireshark: